Lag-screw fixation
1. General considerations
Introduction
Treatment of long oblique and spiral fractures is similar. The difference is in the screw insertion in relation to the fracture plane, which is strictly single in the long oblique fractures. In spiral fractures, the fracture plane is helical; therefore, each screw is inserted in a slightly different direction.
Indirect reduction is achieved by traction and digital manipulation. Usually, these fractures are unstable.
In a long fracture, fixation with two or more lag screws is usually sufficient, and a neutralization plate is not necessary.

A good rule is the following: The fracture line (B) should be at least twice the length of the diameter of the metacarpal diaphysis (A), ie, B ≥ 2A for interfragmentary lag screws to provide sufficient fixation and stability.

Percutaneous vs open reduction and fixation
For spiral fractures, percutaneous treatment is not an option.
Percutaneous reduction and fixation may be performed with acute oblique fractures.
The advantages of percutaneous reduction and fixation are:
- Shorter operation time
- Less soft-tissue damage
- Faster mobilization
This treatment option needs some skills and experience and special reduction forceps to avoid impingement of swollen soft tissue (atraumatic technique).
If a percutaneous reduction is not achievable, the treatment can be changed to open surgery.
Open reduction and fixation may be used in acute and delayed cases. The addition of a neutralization plate also requires open surgery.
Fracture plane
Obliquity of the fracture is possible either in the plane visible in the AP view or the lateral view. Always confirm the fracture configuration with views in both planes.

AO teaching video
Metacarpal IV–Long spiral fracture–Fixation with two 2.0 mm lag screws
2. Patient preparation
Place the patient supine with the arm on a radiolucent hand table.

3. Approaches
For this procedure, the following approaches may be used:
In the 2nd metacarpal, a radial approach may be used. In the 5th metacarpal, an ulnar approach may be used.
4. Closed reduction in acute case
Reduction can be achieved by traction and gentle manual pressure exerted at the site of maximal displacement.
Especially in spiral fractures, shortening of the metacarpal is associated with rotational malalignment. Reduction, therefore, is achieved by a combination of longitudinal traction on the finger and derotation.
Confirm reduction clinically and with an image intensifier. If there is shortening of the finger, then there is often malrotation of the fracture.
If the fracture reduction appears stable, nonoperative treatment may be considered. In this case, confirming reduction with an image intensifier is essential.

Hold the reduction with reduction forceps designed for percutaneous technique. Impingement of soft tissues should be avoided.

5. Open reduction
If closed reduction is not successful or in a nonacute case, proceed with an open reduction.
Visualizing the fracture
Rotate the finger and open the fracture for good direct visualization.
Determine the exact geometry of the fracture. This is very important for later screw placement.

Indirect reduction by traction
An assistant exerts traction while the surgeon reduces the fracture using pressure from a periosteal elevator or a dental pick.

Direct reduction
Gently use pointed reduction forceps to reduce the fracture anatomically.
Confirm reduction visually and with an image intensifier.
It is mandatory to confirm that the apex of each fracture fragment has been properly reduced; otherwise, malrotation may result.

Preliminary fixation
Provisionally hold the reduction with either two K-wires or one K-wire and reduction forceps. Be careful to place them in such a way that they will not conflict with later screw placement.

6. Checking alignment
Identifying malrotation
At this stage, it is advisable to check the alignment and rotational correction by moving the finger through a range of motion.
Rotational alignment can only be judged with flexed metacarpophalangeal (MCP) joints. The fingertips should all point to the scaphoid.
Malrotation may manifest by an overlap of the flexed finger over its neighbor. Subtle rotational malalignments can often be judged by a tilt of the leading edge of the fingernail when the fingers are viewed end-on.
If the patient is conscious and the regional anesthesia still allows active movement, the patient can be asked to extend and flex the finger.
Any malrotation is corrected by direct manipulation and later fixed. Flexing the MCP joints while preventing overlap of the fingers will reduce rotational displacement.

Using the tenodesis effect when under anesthesia
Under general anesthesia, the tenodesis effect is used, with the surgeon fully flexing the wrist to produce extension of the fingers and fully extending the wrist to cause flexion of the fingers.

Alternatively, the surgeon can exert pressure against the muscle bellies of the proximal forearm to cause passive flexion of the fingers.

7. Screw fixation
Each lag screw must be inserted perpendicularly to the fracture plane.
In spiral fractures, the result is that the screws follow a helical disposition.

If the fracture length permits, insert three lag screws. Generally, they should be inserted at equal intervals.
Start with inserting the middle screw.

If the fragment is too short to allow for the insertion of three screws, use two screws, but recognize that this is a less stable construct. If in doubt, add a neutralization plate.
Insert both screws before fully tightening them.
Insert them as perpendicularly to the fracture plane as possible, either in an antegrade or retrograde fashion.

Screw size selection
The exact size of the diameter of the screws used will be determined by the fragment size and the fracture configuration.
The various gliding and thread hole drill sizes for different screws are illustrated here.

Screw length pitfalls
- Too short screws do not have enough threads to engage the far cortex properly. This problem increases when self-tapping screws are used due to the geometry of their tips.
- Too long screws endanger the soft tissues, especially tendons and neurovascular structures. With self-tapping screws, the sharp cutting flutes are especially dangerous, and great care has to be taken that the flutes do not protrude beyond the cortical surface.

Pitfall: screw too close to the fracture

Pitfall: beware of fissure lines

Pitfall: screw convergence

8. Final assessment
Confirm correct rotational alignment by clinical examination.
This intraoperative photo shows the lag screw fixation of a spiral fracture of the 3rd metacarpal shaft.
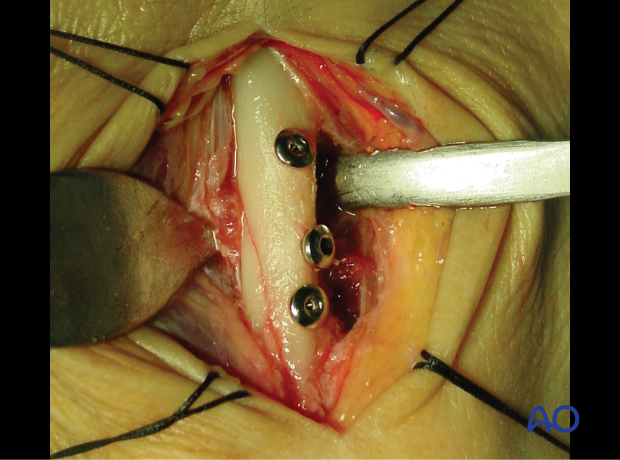
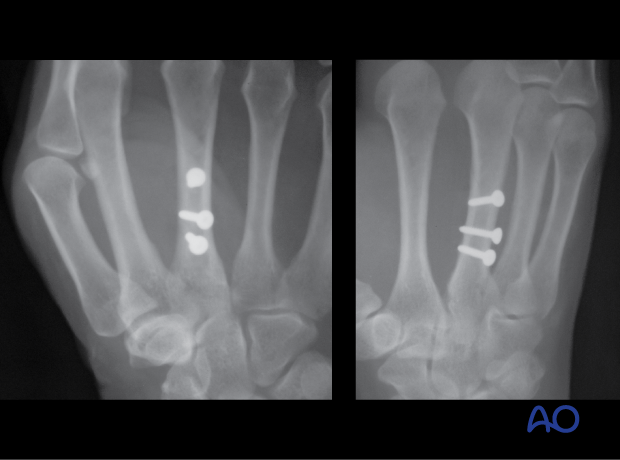
Image intensification may be used to confirm anatomical reduction and correct placement of implants in two views.
9. Aftercare
Postoperative phases
The aftercare can be divided into four phases of healing:
- Inflammatory phase (week 1–3)
- Early repair phase (week 4–6)
- Late repair and early tissue remodeling phase (week 7–12)
- Remodeling and reintegration phase (week 13 onwards)
Full details on each phase can be found here.
Postoperative treatment
If there is swelling, the hand is supported with a dorsal splint for a week. This would allow for finger movement and help with pain and edema control. The arm should be actively elevated to help reduce the swelling.
The hand should be splinted in an intrinsic plus (Edinburgh) position:
- Neutral wrist position or up to 15° extension
- Metacarpophalangeal (MCP) joint in 90° flexion
- Proximal interphalangeal (PIP) joint in extension

The reason for splinting the MCP joint in flexion is to maintain its collateral ligament at maximal length, avoiding scar contraction.
PIP joint extension in this position also maintains the length of the volar plate.

After subsided swelling, protect the digit with buddy strapping to a neighboring finger to neutralize lateral forces on the finger.

Functional exercises
To prevent joint stiffness, the patient should be instructed to begin active motion (flexion and extension) immediately after surgery.

Follow-up
See the patient after 5 and 10 days of surgery.
Implant removal
The implants may need to be removed in cases of soft-tissue irritation.
In case of joint stiffness or tendon adhesion restricting finger movement, arthrolysis or tenolysis may become necessary. In these circumstances, the implants can be removed at the same time.


