Trochanteric flip osteotomy through the Gibson interval
1. General considerations
The ‘modified’ Gibson approach (straight line) is the incision most commonly used.
The Gibson interval is anterior to the gluteus maximus, and therefore allows exposure to the anterior inferior iliac spine. The additional anterior exposure is facilitated with hip flexion and rotation. Therefore, lateral positioning is needed.
The trochanter osteotomy (digastric slide), through this interval, is combined with surgical dislocation of the hip to allow direct access to the femoral head and the superior part of the acetabulum.
The maintenance of knee flexion (at 90°) and hip extension throughout the procedure reduce tension on the sciatic nerve.
AO teaching video
Pelvic and acetabular surgical exposure – Gibson approach with a digastric greater trochanteric osteotomy
(cadaveric dissection; 25 minutes)
2. Skin incision
Start the incision halfway between the iliac crest and the tip of the greater trochanter in line with the femoral shaft.
Extend the incision 5 cm below the vastus ridge. In larger patients, this may need to be extended more.
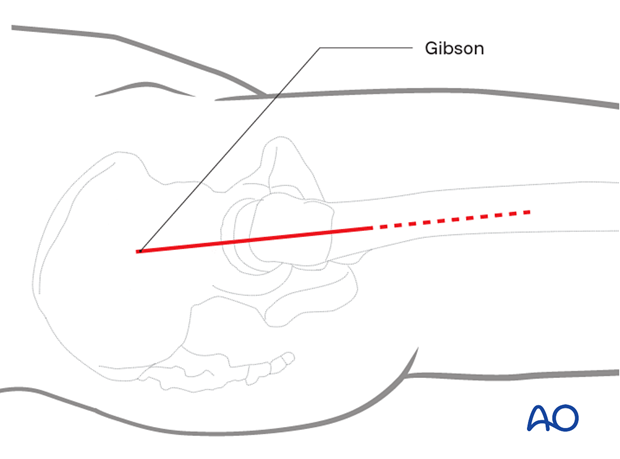
3. Superficial surgical dissection
Deepen the incision through subcutaneous fat. Delineate the Gibson interval between the gluteus maximus and medius. This is accomplished more easily in the proximal portion of the wound. Continue this fascial incision distally to split the iliotibial tract longitudinally.
In some cases, it may be necessary to release a portion of the gluteus maximus tendinous insertion onto the femur in the distal portion of the wound. This facilitates posterior retraction in the larger patient.
Mobilize the gluteus medius fascia with the gluteus maximus muscle belly allowing preservation of important vascular supply from the superior gluteal artery.
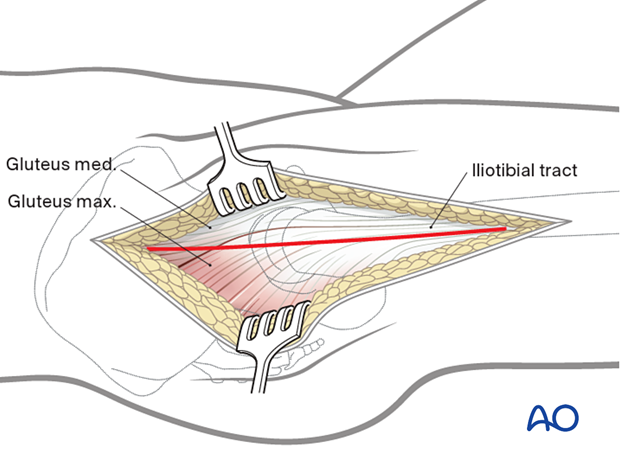
4. Deep dissection
Two vascular landmarks assist in the identification of external rotator anatomy. The trochanteric anastomosis communicates with the ascending branch of the medial femoral circumflex artery at the cranial border of the quadratus femoris.
The second landmark is provided by the inferior gluteal artery branch, which traverses the inferior border of the piriformis tendon. This vessel also anastomoses with the ascending medial femoral circumflex artery.
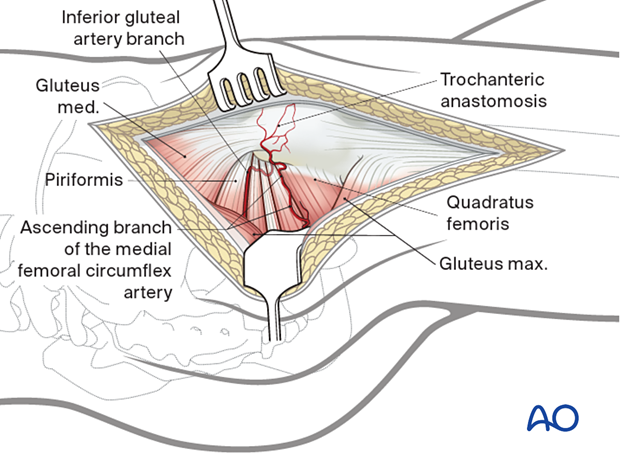
Evaluation of sciatic nerve
Localize the sciatic nerve in its path posterior to the quadratus femoris.
Trace it proximally to the level of the piriformis and note any anomalies in neural anatomy.
In most cases, the sciatic nerve is a single trunk that passes anterior to the piriformis as it enters the greater sciatic notch. In these cases, leave the piriformis attached to the trochanter, and carry out no further dissection in the zone of the short external rotators.
Developing the piriformis interval
This requires inferior retraction of the piriformis and superior retraction of the medius. Sharply mobilize the minimus beginning along its inferior fascial border. The release extends posteriorly to the greater sciatic notch, taking care to avoid injury to the superior gluteal neurovascular bundle. The initial anterior dissection proceeds to the mid supraacetabular area.
Developing the minimus-piriformis interval
Next, develop the interval between the piriformis and gluteus minimus.
This requires inferior retraction of the piriformis.
Protect the minimus muscle because it carries the circumflex vessels. Release it sharply from the retroacetabular surface.
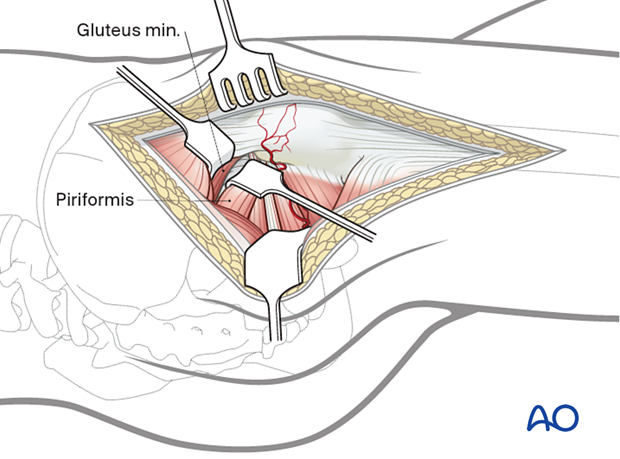
Trochanteric osteotomy
Prepare the plane of the trochanteric osteotomy by cauterizing the trochanteric anastomotic vessels.
It may be useful to predrill the trochanter for subsequent reattachment with screws before the osteotomy.
Perform the osteotomy from the tip of the trochanter to the base of the vastus ridge using a saline-cooled oscillating saw. Leave a small portion of the medius tendon temporarily attached to the intact proximal femur until the trochanter can be mobilized. This provides an additional aid to prevent injury to the retinacular vessels caused by an excessively thick osteotomy.
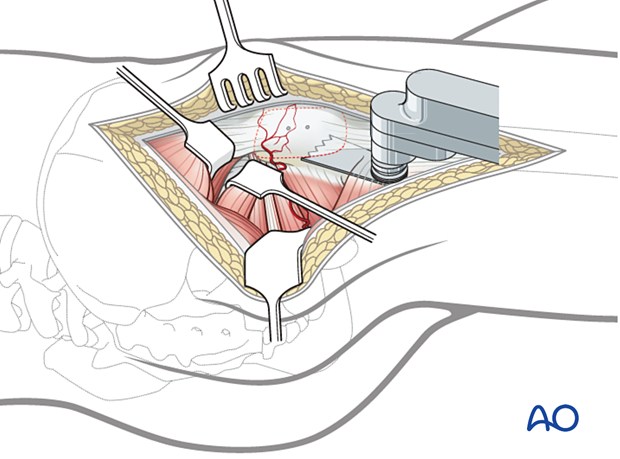
Anterior exposure and mobilization of gluteus minimus
Incise the vastus lateralis fascia from the vastus ridge distally a distance of 5–8 cm to allow extraperiosteal mobilization of the proximal vastus lateralis muscle belly with the trochanteric segment.
Evert the trochanter progressively with a Hohmann retractor placed over the anterior aspect of the greater trochanter. Now, release the small remaining gluteus medius attachment to the intact trochanteric ridge. At times, the piriformis insertion will be partially attached to the mobile trochanteric fragment. This should be released as the trochanter is everted.
Flex and externally rotate the hip to improve anterior exposure with the Cobb elevator. This allows complete mobilization of the gluteus minimus from the supraacetabular surface along the superior capsule to its femoral insertion along the anterior aspect of the trochanter.
The minimus insertion may also straddle the trochanter osteotomy. If so, release it from the intact proximal femur to allow full trochanteric mobilization.
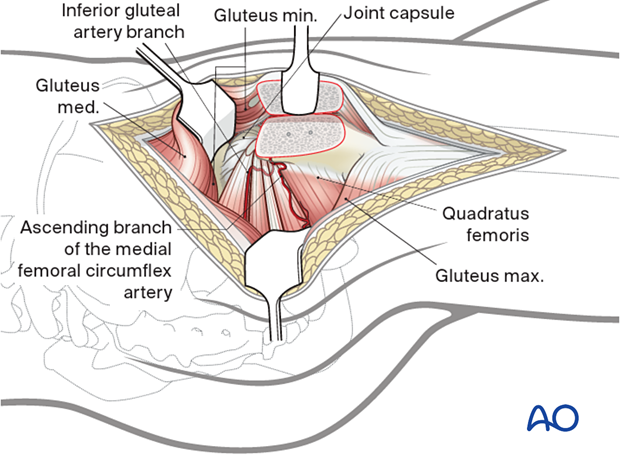
Hemicircumferential view of the acetabular rim
Mobilize the proximal portion of the vastus intermedius to expose the anterior capsule.
Once this is achieved, a hemicircumferential view of the acetabular rim and capsule is provided. This starts posterior and inferior to the retracted piriformis tendon and extends anteriorly around the acetabulum to the level of the reflected head of the rectus.
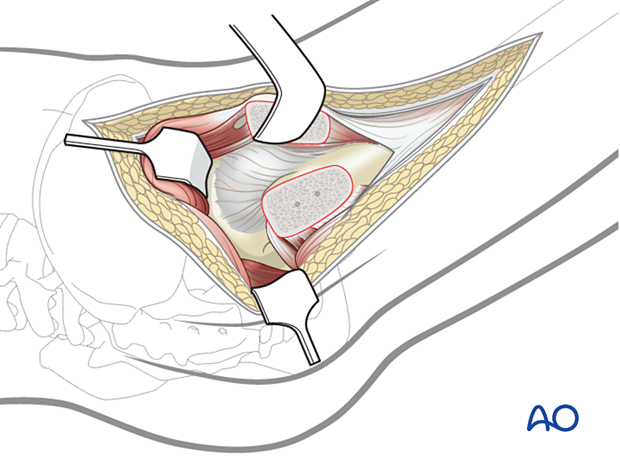
Capsulotomy
Intraarticular visualization is provided by a Z-shaped capsulotomy. The capsular incision must remain anterior to the lesser trochanter to avoid damaging the medial femoral circumflex artery.
This aids reduction of fractures that do not have a posterior or superior wall component. Retraction sutures are useful.
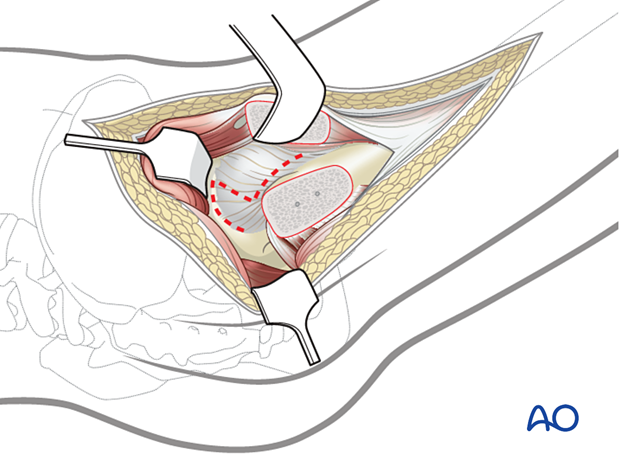
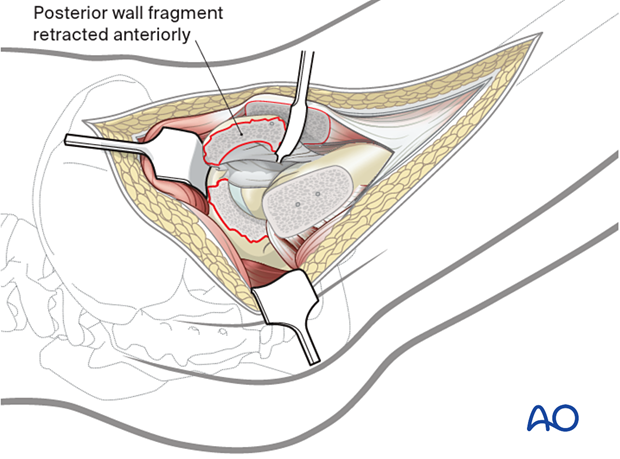
When a posterior wall fracture is present, the capsular pedicle to the wall fragments must be preserved. Modify the capsulotomy to incorporate the posterior wall at its margin.
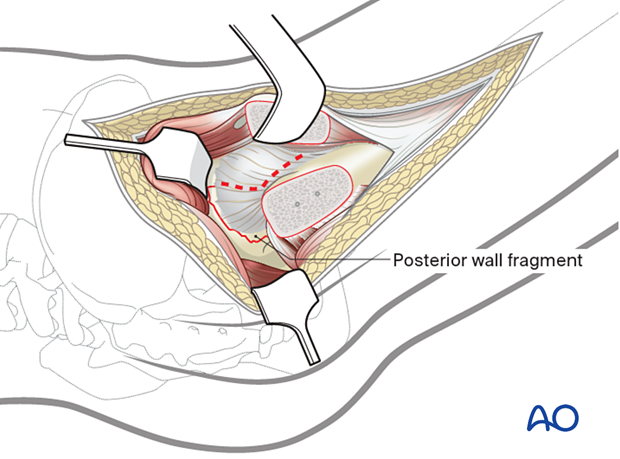
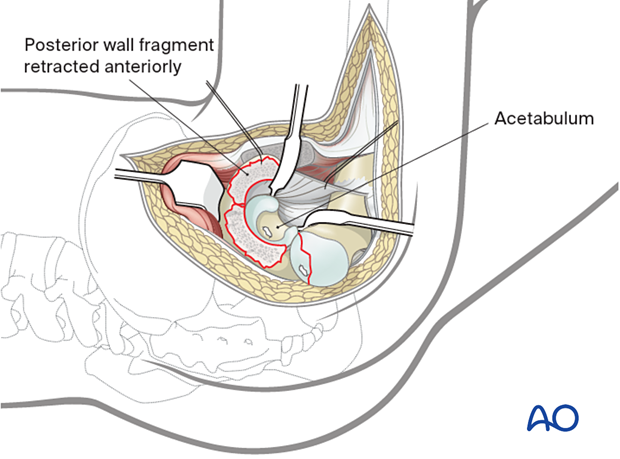
Mobilize and retract the wall fragment(s) to allow joint visualization. The labrum is typically intact at the anterior aspect of the wall fragment; thus, retract the fragment anteriorly, as illustrated. Articular exposure is accessed through the fracture line with femoral distraction.
5. Surgical dislocation of the hip joint
Careful place the involved limb in a figure-of-four position (flexion to 90° combined with adduction and external rotation).
A sterile pouch is required for this maneuver.
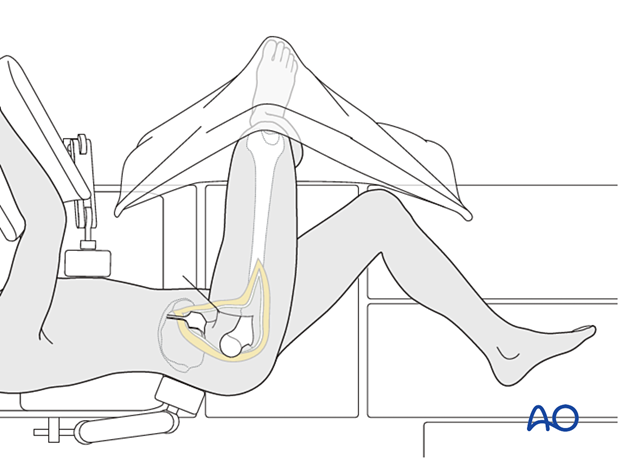
With the femoral head dislocated, one can now visualize the entire femoral head and acetabulum.
6. Wound closure
When the reconstruction is completed, close the capsule loosely to allow drainage of any secondary hemarthrosis.
Reattach the trochanter with lag screws. The screw diameter depends on bone density.
Repair the vastus lateralis fascia and reapproximate the short rotator tendons.
Place deep drains as needed. Repair the gluteus maximus tendon, and lastly, close the iliotibial tract and gluteal fascia.
Subcutaneous drains follow as appropriate, and subcutaneous and skin closure are completed.


